4/26/13
The day flew by today in the lab. All four of the capsules had been taken out of the furnace from last week and I quickly jumped to work cleaning them out. After breaking the capsules open and trying not to breathe in too many of the less than pleasant sulfur fumes, I scraped the sulfur-34 from the glass and extracted the four crystals. I then let them soak in 4 different beakers of ethanol and put them in the ultrasonic. The ultrasonic however had too much water in it, and with the vibrations of the ultrasonic, my four little beakers almost started floating away. After dumping out a little of the water, my beakers were now comfortably resting on the bottom and I was able to turn on the ultrasonic without fear of my beakers tipping over, losing the recycled sulfur-34 in the process.
After I was done with the crystals Heather was nice enough to suggest that we could work on my poster. We downloaded everything on the lab computer and began looking at graphs. I found the linear fit using excel of a sphalerite crystal that had been scanned by the ion beam in a process called Rutherford backscattering spectrometry or RBS. This is where a burst of Helium ions are shot at the sample and a detector analyzes the backscattered electrons. Daniele then showed me a detector she would use. It was a shiny gold colored cylinder with a smaller mirror-like cylinder at its core. Daniele told me the outside was usually made of gold or platinum to help contain the particles. The mirror-like cylinder was made of silicon. The very top layer of the cylinder was doped silicon that was silicon and a lot of other elements about the width of a hair thick. The rest of the cylinder was simply pure silicon. It is the silicon that does the analyzing and measures the electron pairs that exit the sample. Using this RBS graph, I used the linear fit to calculate the activation energy of this sphalerite sample. Heather showed me the formula:
D = D0 exp (–Q/RT)
where D is the diffusivity
D0 is a constant
Q is the activation energy
R is the gas constant
and T is the temperature in Kelvins
After taking the natural log of both sides and doing other math, I found the activation energy to be 131 which Daniele said was a reasonable number. I had finally gotten a number from my data!
Next week, Daniele and Heather are taking me to see the ion beam at SUNY Albany. I am super excited to see the facility and finally see the behind-the-scenes analyzing that happens after I extract my crystals. It should be lots of fun even though I sadly only have one week left after the ion beam before my internship draws to a close.
Tuesday, April 30, 2013
Monday, April 22, 2013
Clashing Conflicts
4/5/13
Did not meet with Daniele today due to the Open House where I was asked to speak on a panel :)
Did not meet with Daniele today due to the Open House where I was asked to speak on a panel :)
Bandaging Blanks
4/19/13
 Today I had a little trouble finding Daniele as I wander the catacombs of the RPI basement. After I finally stumbled upon Daniele, she showed me a list she had made planning out the experiments we should do in order to fill in the gaps in our data. We decided to plan to do three sphalerite experiments at 650, 750 and 850 degrees Celsius to get some data of sulfur diffusion at higher temperatures. We also planned on doing another experiment with celestite and barite at a higher temperature of 600 degrees Celsius because the diffusion did not occus at a perceptible rate in our previous experiment. With this busy to-do list ahead of us, I quickly set to work making the first sphalerite capsule. It took me no time at all with the finished result on the left. Daniele already had a furnace set at the correct temperature, so we walked to the furnace room to put in our first sphalerite experiment at a steamy 850 degrees Celsius. I had to be very careful putting in the experiment, because just because the thermocouple didn't look hot, it had just been in an 850 degree furnace and could cause quite a burn. My favorite part of this day in the lab had to be looking in the furnace after I had put in my capsule. This was the hottest I had seen a furnace and when I looked inside, I could see the ceramic pipe glowing a burning hot red.

 After I had finished the first sphalerite capsule I proceeded to begin work on another sphalerite capsule. I quickly cranked out another one, but not before noticing something near the Bunsen burner before I finished sealing my sphalerite capsule. I had stumbled upon capsuleception. The person who had been working in the lab before me had made a capsule, within a capsule, within a capsule! Daniele explained how this technique created ideal atmospheric conditions for the capsule containing the intended reaction. After finally sealing my sphalerite capsule, Daniele, Heather and I went to check if there were any furnaces available near one of the temperatures we were aiming to test. Since none of the furnaces were going to reach 650 degrees anytime soon, I headed back to the lab to work on making some more capsules. I had just enough time to find a really nice barite and celestite crystal to put in a capsule and quickly seal two capsules in record time. After being complimented on my capsule-making finesse I ran out to the van just in time for my shuttle. Next week, Daniele and I are going to work on setting up a few more experiments and looking at data. More excitingly, I have planned a trip with Daniele for May 3rd to go and see the ion beam in SUNY Albany that Daniele uses to analyze our crystals to see the results of sulfur diffusion. Hopefully I'll have some exciting pictures in two weeks and I'll collect my data in no time!
 Today I had a little trouble finding Daniele as I wander the catacombs of the RPI basement. After I finally stumbled upon Daniele, she showed me a list she had made planning out the experiments we should do in order to fill in the gaps in our data. We decided to plan to do three sphalerite experiments at 650, 750 and 850 degrees Celsius to get some data of sulfur diffusion at higher temperatures. We also planned on doing another experiment with celestite and barite at a higher temperature of 600 degrees Celsius because the diffusion did not occus at a perceptible rate in our previous experiment. With this busy to-do list ahead of us, I quickly set to work making the first sphalerite capsule. It took me no time at all with the finished result on the left. Daniele already had a furnace set at the correct temperature, so we walked to the furnace room to put in our first sphalerite experiment at a steamy 850 degrees Celsius. I had to be very careful putting in the experiment, because just because the thermocouple didn't look hot, it had just been in an 850 degree furnace and could cause quite a burn. My favorite part of this day in the lab had to be looking in the furnace after I had put in my capsule. This was the hottest I had seen a furnace and when I looked inside, I could see the ceramic pipe glowing a burning hot red.
 After I had finished the first sphalerite capsule I proceeded to begin work on another sphalerite capsule. I quickly cranked out another one, but not before noticing something near the Bunsen burner before I finished sealing my sphalerite capsule. I had stumbled upon capsuleception. The person who had been working in the lab before me had made a capsule, within a capsule, within a capsule! Daniele explained how this technique created ideal atmospheric conditions for the capsule containing the intended reaction. After finally sealing my sphalerite capsule, Daniele, Heather and I went to check if there were any furnaces available near one of the temperatures we were aiming to test. Since none of the furnaces were going to reach 650 degrees anytime soon, I headed back to the lab to work on making some more capsules. I had just enough time to find a really nice barite and celestite crystal to put in a capsule and quickly seal two capsules in record time. After being complimented on my capsule-making finesse I ran out to the van just in time for my shuttle. Next week, Daniele and I are going to work on setting up a few more experiments and looking at data. More excitingly, I have planned a trip with Daniele for May 3rd to go and see the ion beam in SUNY Albany that Daniele uses to analyze our crystals to see the results of sulfur diffusion. Hopefully I'll have some exciting pictures in two weeks and I'll collect my data in no time!
Tuesday, April 16, 2013
Gallant Graphing
4/12/13
Today I worked with Daniele at cleaning out two capsules that I had put in before break. Our capsules weren't labeled and Daniele couldn't find her notes from before the experiments were put in. After getting a little concerned, we looked more closely at the crystals within the capsules. Daniele reminded me how the barite and celestite crystals had different shapes even though they had similar clear coloring. I identified the more prism-shaped crystal as the celestite and Daniele agreed with me. We quickly cleaned out the two capsules and since Heather was going to be late, Daniele set me up on a computer in the lab. She had some barite results and she wanted me to make a curve to try and match the data.
 The pink line is the line I eventually got to fit the results by manipulating data on excel. The y-values represent the counts a receptor received after an ion beam hit our sample to analyze it. The x-values represent the distance within the crystal, which as you can see from the data, the data the receptor receives decreases the deeper into the crystal you go. After I manipulated a few graphs to find the line of best fit, Heather showed up and we decided to run another sphalerite crystal at around 750 degrees Celsius to fill some holes in our data. My internship literally flew by today as the furnaces take forever to heat up to the correct temperature because they overshoot and then turn off, undershooting before turning back on. These fluctuations take a long time to regulate so sadly we ran out of time before we could put another experiment into the furnace. Hopefully next week I'll have some more data and can potentially work with manipulating more graphs.
Today I worked with Daniele at cleaning out two capsules that I had put in before break. Our capsules weren't labeled and Daniele couldn't find her notes from before the experiments were put in. After getting a little concerned, we looked more closely at the crystals within the capsules. Daniele reminded me how the barite and celestite crystals had different shapes even though they had similar clear coloring. I identified the more prism-shaped crystal as the celestite and Daniele agreed with me. We quickly cleaned out the two capsules and since Heather was going to be late, Daniele set me up on a computer in the lab. She had some barite results and she wanted me to make a curve to try and match the data.

Tuesday, March 19, 2013
Crystal Creations
3/15/13
When I walked into the lab today, Daniele was having a discussion with Dr. Watson, so I decided to go out into the hall and take a closer look at the displays and some of the posters. One display showed a multitude of rocks that could be found around New York State. I spent a while looking at the slate (which I have often seen while hiking or in my grandma's backyard) and took a little pride in being able to recognize a few (by which I mean a very few) number of the rocks on display. Right before Daniele was done with her conversation, Heather walked in and we began to clean out the barite crystal that we had put in the furnace last week. This crystal was not enclosed by the sulfur because the capsule had cooled while resting on its side, causing the sulfur to dry along the sides of the capsule rather than encasing the crystal. After easily removing the crystal, we spent the rest of our time in the lab making two new capsules, one containing barite and the other celestite. We started with the barite crystal. I hunted through our drawer in the lab, eventually finding the barite crystals we had polished a few weeks ago. I quickly made the capsule with my ever increasing Bunsen burner abilities. Finding a celestite crystal to do an experiment on was a little more tricky. As I explained last week, the celestite crystals are very prism-like and have lots of small flat surfaces. That makes it difficult to find one large flat surface that would be sufficient for an experiment.
After finally finding a crystal, Daniele showed me a huge block of synthetic quartz. I have to admit I have a soft spot for shiny things and the quartz had me enraptured. It was a huge block about the length of my hand and almost perfectly clear. It looked a lot like glass except it's density was different along with the texture. Daniele then showed me more crystals that the lab had bought and collected over the years, including bright green yag.

Our crystal was not cut like this one above, but it gives you an idea of what yag looked like when previously I didn't even know yag was a word.
She also showed me some beautiful crystals each about the size of my thumb that had cost a whopping $1500. I was blown away that the crystals that were being experimented on in the lab could cost so much. Daniele then talked about how many crystals could be grown using a seed, which would then be built upon layer by layer until the crystal had formed. We then had to quickly wrap up our conversation on crystals because I only had 10 minutes to evacuate and seal my celestite crystal. After sealing the capsule with an expert's touch, I carried my two capsules to the furnace. There we put both capsules on one thermocouple so we could run the experiment simultaneously and only use one furnace. We ran the experiment at 500 degrees Celsius, and hopefully we won't have any complications. I hope to have some new date to look at when I return to the lab with our growing data on our sulfate crystals.
When I walked into the lab today, Daniele was having a discussion with Dr. Watson, so I decided to go out into the hall and take a closer look at the displays and some of the posters. One display showed a multitude of rocks that could be found around New York State. I spent a while looking at the slate (which I have often seen while hiking or in my grandma's backyard) and took a little pride in being able to recognize a few (by which I mean a very few) number of the rocks on display. Right before Daniele was done with her conversation, Heather walked in and we began to clean out the barite crystal that we had put in the furnace last week. This crystal was not enclosed by the sulfur because the capsule had cooled while resting on its side, causing the sulfur to dry along the sides of the capsule rather than encasing the crystal. After easily removing the crystal, we spent the rest of our time in the lab making two new capsules, one containing barite and the other celestite. We started with the barite crystal. I hunted through our drawer in the lab, eventually finding the barite crystals we had polished a few weeks ago. I quickly made the capsule with my ever increasing Bunsen burner abilities. Finding a celestite crystal to do an experiment on was a little more tricky. As I explained last week, the celestite crystals are very prism-like and have lots of small flat surfaces. That makes it difficult to find one large flat surface that would be sufficient for an experiment.
After finally finding a crystal, Daniele showed me a huge block of synthetic quartz. I have to admit I have a soft spot for shiny things and the quartz had me enraptured. It was a huge block about the length of my hand and almost perfectly clear. It looked a lot like glass except it's density was different along with the texture. Daniele then showed me more crystals that the lab had bought and collected over the years, including bright green yag.
Our crystal was not cut like this one above, but it gives you an idea of what yag looked like when previously I didn't even know yag was a word.
She also showed me some beautiful crystals each about the size of my thumb that had cost a whopping $1500. I was blown away that the crystals that were being experimented on in the lab could cost so much. Daniele then talked about how many crystals could be grown using a seed, which would then be built upon layer by layer until the crystal had formed. We then had to quickly wrap up our conversation on crystals because I only had 10 minutes to evacuate and seal my celestite crystal. After sealing the capsule with an expert's touch, I carried my two capsules to the furnace. There we put both capsules on one thermocouple so we could run the experiment simultaneously and only use one furnace. We ran the experiment at 500 degrees Celsius, and hopefully we won't have any complications. I hope to have some new date to look at when I return to the lab with our growing data on our sulfate crystals.
Sunday, March 10, 2013
Stealing Sulfates
3/08/13
Heather emailed right before I left for my internship saying that she would be late coming in today, so I braved the snowy weather to start my day cleaning a capsule with Daniele. We went into the furnace room where we removed the capsule with barite in it that we had made last time before taking it to the lab to recycle the sulfur-34 and remove the crystal. While there, Daniele told me that Heather had been able to find the barite crystal that had gone flying out of the tweezers last week. This is great, because now with two barite crystals, Daniele can start to make a profile on this sulfate that she has never experimented with before in order to figure out a basic idea of how sulfur diffuses through barite. The crystal didn't give us too much trouble when removing it from the capsule though it did have to go in the ultrasonic a few times, but we quickly had the crystal extracted in no time. At this point Heather had showed up, and we decided to hunt down a few more sulfates to experiment on. After hunting down several different keys, we opened the display case outside the lab and sneakily chiseled away at some of the minerals. Dr. Bruce Watson had given Daniele two containers of barite, so we now had quite the collection of sulfates.

 The picture on the left is all of our sulfates with the two barite minerals on top and our thieved minerals below. The minerals we chipped away at are gypsum and celestite. Celestite in the picture on the right is on the left and was in small crystals forming a large mineral. Celestite is a strontium sulfate. The gypsum is the rightmost container and is a calcium sulfate that also contains water. The crystal we took those small chips from was huge and had to weight about 40 pounds. It was a very soft mineral so it was pretty easy to chip off a few flaky pieces and head back to the lab. Daniele decided for us to use one of the barite crystals Dr. Watson had give us, and after looking at a nice crystal with a flat surface under the microscope we saw the crystals were very good quality with hardly any inclusions. We were running out of tube to form capsules with, so with a diamond cutter that looked a lot like a pen except with a small diamond for the tip, I cut a few tubes and sealed the bottoms with the Bunsen burner to create one half of the capsule. After placing these tube in the drying oven to remove any moisture within the tube, I placed my barite crystal and sulfur-34 within the tube. I used the vacuum to evacuate the capsule, I quickly sealed it off and had a ready-to-go capsule. It was then time for me to run so before the capsule had even cooled, I had to run out the lab in order to make it to the shuttle on time. Daniele is going to get some more data from the crystals on Monday when she uses the ion beam and hopefully I'll be able to look at some of this data next week. I'm also looking forward to doing some more experiments with different sulfates.
Sunday, March 3, 2013
Missing Minerals
3/1/13
Today, I started my internship by cleaning out the barite capsule we had put in the furnace last week. The barite looked a little dark like one of our previous galena experiments, which worries Daniele about contaminants possibly interfering with the experiment. I have found the perfect balance between shattering the capsule all over the lab and not cracking the glass, and I was actually quite proud of my experienced tap that quickly halved the capsule. I recycled the sulfur-34, removing it from the sides of the capsule with ethanol, but the barite crystal was giving me a little trouble as it was trapped within the sulfur. I filled up a beaker with ethanol and then placed the barite in the ultrasonic. Here are some pictures from last week that Heather and I took of the barite.

 As you can see, it is a clear crystal, so we placed the crystals on some purple post-it notes so that they would show up more clearly under the light microscope. After putting the barite in the ultrasonic, Daniele, Heather and I headed down the hall to work on some more simulations. We worked on data from two different sphalerite minerals and I practiced learning which data to manipulate in order to match the simulation's graph with our data. For example, if the peak on our simulation's graph for the sulfur-34 was higher than that of our data, I would change the ratio of sulfur-32 and sulfur-34 in the simulation, making the sulfur-34 lower so that peak would be lower. With this data manipulation, practice makes perfect as I began to figure out how thick to make a layer of sulfur in order for the simulation graph to line up and how to slowly decrease the sulfur-34 levels. The sulfur-34 should decrease throughout the sphalerite as you get to deeper and deeper layers because the sulfur will have a harder time penetrating. That information must be reflected in the simulation where the graphs must line up and have the sulfur-34 values decrease over time until only the sulfur found within the sphalerite sulfide is present. After working on graph manipulations, we headed back to the lab to look at our barite crystal. We decided to give it a few more minutes in the ultrasonic and begin working on another barite capsule. After filling a glass tube with a sealed end with a carefully selected barite mineral with a polished surface and some sulfur-34, I hooked up the tube to the vacuum to be evacuated. While I was doing this, Heather checked on the barite crystal and took it out of the ultrasonic. Sadly, when Heather was removing the barite from the ultrasonic and trying to transfer it to the light microscope, our sample went shooting out of the tweezers and somewhere into the vicinity. The fact that the crystal was clear made our quest all the more difficult as we began searching the lab floor on our hands and knees searching for our missing experiment. Though I tried to linger as long as possible, I had to leave for my shuttle back to Emma, but hopefully Daniele and Heather were able to relocate the missing crystal. If not, we'll have a new barite capsule to put in the furnace next week and hopefully some more work with simulations. I will also have to work on making a few more glass tubes with sealed ends for our capsules next week since our supplies are running low.
Friday, February 22, 2013
Lethal Lead and Silly Salt
2/22/13
Today I started off my internship by cleaning out a sphalerite capsule from last week. I extracted the sulfur 34, but there as still a lot of sulfur stuck to the sphalerite mineral. I put the mineral in a beaker with some ethanol and placed it in the ultrasonic cleaner which sends ultrasound waves through the water to try and break up the sulfur on the mineral without damaging or scratching it in the process. While the sphalerite was being cleaned, Heather and I looked at the polished barite minerals that were still attached by crystal bond to a metal disk. After singling out a crystal with the smoothest surface, I carried the disk over to the hot plate. After the crystal bond had softened, I extracted the desired crystal and put it in a beaker with ethanol where it joined the sphalerite in the ultrasonic. While we waited for the ultrasonic to remove the crystal bond from the barite, Daniele, Heather and I went to the furnace. Barite is a softer mineral and not too many experiments have been done with sulfates so we decided to run our experiment at a low 300 degrees Celsius and to take the experiment out on Monday to ensure the sulfur wouldn't travel all the way through the barite before we took it out. After finding a furnace that was pretty close to 300 degrees we headed back to the lab. Daniele had to go to a conference call, so Heather and I looked at some of the other barite minerals under the microscope. We took some really cool pictures on Heather's phone and I hope to be able to put those up when she sends them to me. However, Heather did send me a picture last week of a capsule right after she took it out of the furnace.
 As you can see, the sulfur is a reddish color when it comes out of the furnace! Usually it's a lot more red, but it has already started to cool in this picture. After looking at the barite minerals under the microscope, we filled a capsule with our desired barite mineral and some recycled sulfur 34 along with some new sulfur. We evacuated the capsule using the vacuum and while we were waiting, went to check on the furnace one last time. By the time we got back, our tube with the sulfur and barite was ready to be capsulized! Heather complemented me on my speedy efficiency as I quickly melted the tube to form a vacuum sealed capsule. We then placed the capsule in the furnace. With some time to kill, Heather took me to the room across from the lab where a lot of the pressurized furnaces are kept. We looked at some big metal tables that had been made in the workshop and were being sanded down. Apparently some of the soldering had some lead in them so we tried not to breathe too much. Heather showed me some salt that a mechanized mortar and pestle was grinding This salt will be pressurized into solid tubes which are used in the pressurized surfaces. An electrical current heats up the sample while the pressurized furnace simultaneously exerts a force upon it. The salt cells help to distribute this pressure fairly evenly throughout the experiment. The electrical current helps to make the salt soft, which helps to make sure the entire area surrounding the experiment is pressurized. Next week, we are going to look at some data from a former sphalerite experiment along with clean out the barite capsule. I'll try and put up some of the pictures I took today as soon as Heather sends them which will hopefully be before then.
Today I started off my internship by cleaning out a sphalerite capsule from last week. I extracted the sulfur 34, but there as still a lot of sulfur stuck to the sphalerite mineral. I put the mineral in a beaker with some ethanol and placed it in the ultrasonic cleaner which sends ultrasound waves through the water to try and break up the sulfur on the mineral without damaging or scratching it in the process. While the sphalerite was being cleaned, Heather and I looked at the polished barite minerals that were still attached by crystal bond to a metal disk. After singling out a crystal with the smoothest surface, I carried the disk over to the hot plate. After the crystal bond had softened, I extracted the desired crystal and put it in a beaker with ethanol where it joined the sphalerite in the ultrasonic. While we waited for the ultrasonic to remove the crystal bond from the barite, Daniele, Heather and I went to the furnace. Barite is a softer mineral and not too many experiments have been done with sulfates so we decided to run our experiment at a low 300 degrees Celsius and to take the experiment out on Monday to ensure the sulfur wouldn't travel all the way through the barite before we took it out. After finding a furnace that was pretty close to 300 degrees we headed back to the lab. Daniele had to go to a conference call, so Heather and I looked at some of the other barite minerals under the microscope. We took some really cool pictures on Heather's phone and I hope to be able to put those up when she sends them to me. However, Heather did send me a picture last week of a capsule right after she took it out of the furnace.

Sunday, February 17, 2013
Brilliant Barite
2/15/13
Today I was a little late getting to my internship due to Emma idol. Even with a late start, Daniele, Heather and I were still able to get a bit done. We started cleaning out 2 previous capsules, one which contained galena and the other sphalerite. The sulfur within the galena capsule looked dark and not normal compared to previous capsules, so Daniele and I think some of the recycled sulfur-34 we have been using has been picking up contaminants. We decided to be a little more careful and selective with the recycled sulfur-34 to try and prevent contamination. The galena mineral was easy enough to extract from the capsule, but the sphalerite capsule was giving us a little trouble. Even though we had put the capsules on their sides when taking them out of the furnace to try and prevent the sulfur from encompassing the mineral in the capsule, the sulfur had still completely covered the sphalerite mineral. We began to slowly chip away at the unrelenting sulfur with a combination of a metal pick and ethanol. While we were soaking the capsule in ethanol, we decided to do an experiment with a new mineral. Sphalerite and galena are both sulfides, but we decided to use a sulfate. While a sulfide is just a mineral that contains sulfur, a sulfate contains both sulfur and oxygen molecules. Heather found some barite in a display case outside the lab and we used a makeshift chisel to extract some shards. After chiseling out some tiny chunks, we began to examine the shards under the microscope to see if we would have to polish them. While some of the barite contained little black flecks, which were particles the mineral had picked up throughout its growth, most of the shards would be experiment-ready with a little polishing. I headed over to the hot plate and melted some crystal bond on a tiny metal disk before setting the minerals. I polished them on a fine grain and when I was finished, Heather had just enough time to show me a video of a meteor that had landed in Russia. The compilation of videos was amazing and though the meteor did injure around 1000 people, the meteor in the video was pretty incredible to look at. You can watch the video here!
Hopefully next week we'll get a chance to make a capsule for the barite and put it in the furnace along with look at some more data.
Sunday, February 10, 2013
Individual Investigations
2/9/13
Heather and Daniele were both out of town today so Heather sent me an article giving a big-picture overview of the element sulfur along with an excel spreadsheet to look at some of the patterns formed with sulfur concentration as it diffused through pyrite. The article taught me some interesting new facts about sulfur, including its huge impact on all life forms. Sulfur is essential for life and in fact, a large portion of your body is made up of sulfur. Sulfur helps to synthesize proteins, which make up every part of your body including muscles organs and tissues. The article also gave me a bit of a history lesson, explaining how the US used to extract sulfur from the tops of salt domes. While the US has stopped extracting sulfur this way, it still remains the largest sulfur producer, recycling sulfur that is a by-product from petroleum refineries. This sulfur can be used in fertilizers, rubber, paper manufacturing and other industrial products. With sulfur also being utilized rather than simply an excess byproduct, companies have greatly reduced their sulfur emissions, choosing to process and utilize this resource instead. The article also talked about how there is some debate as to which sulfur isotopes appeared on Earth first. Theories predict that sulfur isotopes with greater mass were created later, but I want to ask Heather and Daniele more about this next week to better understand these theories.
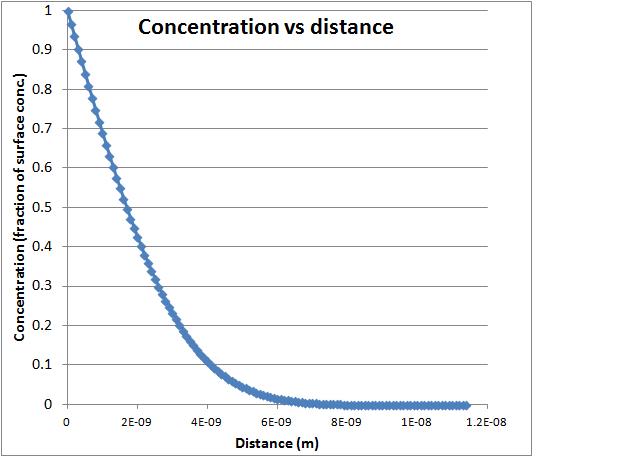
After reading the article I began to look over Heather's Excel sheet. The Excel sheet allowed me to manipulate a graph showing the concentration of sulfur through pyrite. It did this by showing the concentration of the sulfur through each layer of pyrite. As the sulfur got deeper within the pyrite, the concentration decreased, because it took more energy for the sulfur molecules to travel deeper within the pyrite. As the temperature decreased, the sulfur traveled through fewer layers, and this I assume, is because the molecules would have less energy. As I increased the time the sulfur was heated with the pyrite, the slope of the graph got steeper, showing that the sulfur was able to penetrate through more layers over time. If the temperature was increased and the time decreased, the graph never leveled out. The graph below eventually flatlines, when the sulfur concentration reaches zero because it can travel no further through the pyrite. If the temperature was increased, the sulfur molecules would have more energy to travel through the pyrite, but because the time was decreased, they would not have enough time to travel to the maximum depth. The third value I could manipulate on the graph was called D at temperature, which I'm assuming is the average distance traveled through the pyrite at a certain temperature, but I'll have to ask Heather and Daniele next week to make sure. Here is a picture of the graph I was manipulating. You can see how the graph levels off where the concentration approaches zero as it goes deeper within the pyrite.
Heather and Daniele were both out of town today so Heather sent me an article giving a big-picture overview of the element sulfur along with an excel spreadsheet to look at some of the patterns formed with sulfur concentration as it diffused through pyrite. The article taught me some interesting new facts about sulfur, including its huge impact on all life forms. Sulfur is essential for life and in fact, a large portion of your body is made up of sulfur. Sulfur helps to synthesize proteins, which make up every part of your body including muscles organs and tissues. The article also gave me a bit of a history lesson, explaining how the US used to extract sulfur from the tops of salt domes. While the US has stopped extracting sulfur this way, it still remains the largest sulfur producer, recycling sulfur that is a by-product from petroleum refineries. This sulfur can be used in fertilizers, rubber, paper manufacturing and other industrial products. With sulfur also being utilized rather than simply an excess byproduct, companies have greatly reduced their sulfur emissions, choosing to process and utilize this resource instead. The article also talked about how there is some debate as to which sulfur isotopes appeared on Earth first. Theories predict that sulfur isotopes with greater mass were created later, but I want to ask Heather and Daniele more about this next week to better understand these theories.
After reading the article I began to look over Heather's Excel sheet. The Excel sheet allowed me to manipulate a graph showing the concentration of sulfur through pyrite. It did this by showing the concentration of the sulfur through each layer of pyrite. As the sulfur got deeper within the pyrite, the concentration decreased, because it took more energy for the sulfur molecules to travel deeper within the pyrite. As the temperature decreased, the sulfur traveled through fewer layers, and this I assume, is because the molecules would have less energy. As I increased the time the sulfur was heated with the pyrite, the slope of the graph got steeper, showing that the sulfur was able to penetrate through more layers over time. If the temperature was increased and the time decreased, the graph never leveled out. The graph below eventually flatlines, when the sulfur concentration reaches zero because it can travel no further through the pyrite. If the temperature was increased, the sulfur molecules would have more energy to travel through the pyrite, but because the time was decreased, they would not have enough time to travel to the maximum depth. The third value I could manipulate on the graph was called D at temperature, which I'm assuming is the average distance traveled through the pyrite at a certain temperature, but I'll have to ask Heather and Daniele next week to make sure. Here is a picture of the graph I was manipulating. You can see how the graph levels off where the concentration approaches zero as it goes deeper within the pyrite.

Saturday, February 2, 2013
Perplexing Programs
2/1/13
Daniele and I hopped right into things, cleaning out a capsule from last week that Daniele had removed from the furnace. Daniele had let the molten sulfur cool with the capsule on its side, so this time, we avoided the problem of having the mineral buried within a solidified chunk of sulfur. After scraping out the tube with ethanol and a spatula and placing the powdery liquid under a heat lamp, I had successfully recycled our sample of sulfur-34. We then started to make anothetor capsule with one of the galena crystals Heather had polished. Using the tubes that I had half sealed last week, we hooked up the capsule with the galena and sulfur to the vacuum and then formed our capsule by melting the other end up the tube. Luckily, I have not been setting things on fire lately and Daniele says I am getting better. Next we went to the furnace to put in our new sample and adjust a different furnace for a sphalerite experiment we were going to run. After inserting the capsule and changing the temperature of a different furnace we headed back to the lab to begin making our sphalerite sample. I used the last of the recycled sulfur-34 and some of the new sulfur Daniele had gotten to have enough sulfur to promote maximum diffusion through the sphalerite crystal. We hooked the sphalerite up to the vacuum and then headed off down the hall where I began to look at the simulation websites.
Though the simulation was confusing at first, I eventually began to get the gist of things.
 The above is one of the graphs we were looking at. The blue line is the simulation generated by the computer and the darker line are the points found by the accelerator when examining a mineral. By changing certain things like the ratio of the sulfur to the other element that makes up the sulfide mineral or the thickness of the layer, we can make the simulation more closely match the actual graph. After editing layer after layer of the mineral to modify the simulation, the simulation will finally match the data and we can determine the concentration of sulfur molecules at each depth of the mineral. After determining the concentration of the sulfur at each layer, we can then make a graph showing this concentration slowly decreasing as you travel deeper within the molecule. With this data, we can begin to calculate the rate of the diffusion of the sulfur which will provide us with the necessary data for our experiment on sulfur diffusion. The graph above shows the data from a sphalerite mineral. The left side of the graph shows the smaller sulfur molecules while the right shows the larger zinc molecules that also make up the sphalerite sample.The little bump in the graph between the two represents the sulfur-34, the sulfur isotope we are working with in our experiment. Though I still only have a basic understanding of how to modify the simulation graph, after about an hour of practice with Heather and Daniele, I started getting better at manipulation numbers and adding data. Next week, I will not meet with Heather and Daniele, but Heather is going to send my articles and some calculations I can work on.
Daniele and I hopped right into things, cleaning out a capsule from last week that Daniele had removed from the furnace. Daniele had let the molten sulfur cool with the capsule on its side, so this time, we avoided the problem of having the mineral buried within a solidified chunk of sulfur. After scraping out the tube with ethanol and a spatula and placing the powdery liquid under a heat lamp, I had successfully recycled our sample of sulfur-34. We then started to make anothetor capsule with one of the galena crystals Heather had polished. Using the tubes that I had half sealed last week, we hooked up the capsule with the galena and sulfur to the vacuum and then formed our capsule by melting the other end up the tube. Luckily, I have not been setting things on fire lately and Daniele says I am getting better. Next we went to the furnace to put in our new sample and adjust a different furnace for a sphalerite experiment we were going to run. After inserting the capsule and changing the temperature of a different furnace we headed back to the lab to begin making our sphalerite sample. I used the last of the recycled sulfur-34 and some of the new sulfur Daniele had gotten to have enough sulfur to promote maximum diffusion through the sphalerite crystal. We hooked the sphalerite up to the vacuum and then headed off down the hall where I began to look at the simulation websites.
Though the simulation was confusing at first, I eventually began to get the gist of things.

Sunday, January 27, 2013
Continuing Creations
1/25/13
Daniele Heather and I spent most of today gathering the three different experiments we had running in the kiln last week. Daniele had already taken the sample we put in the kiln at 750 degrees Celsius so we headed off to the lab to extract our materials. To open the vacuum sealed tube, Daniele simply took a hammer and cracked one end of the tube open, leaving the sample at the other end of the tube easier to extract. We then began to scrape the sulfur from the sides of the capsule. After prying the sphalerite mineral from within the hardened sulfur, we placed it in acetone to try and get rid of some of the excess sulfur. We also squirted some ethanol into the capsule which helped remove the sulfur from the sides of the capsule, allowing us to recycle as much of the sulfur-34 as possible. After this, Heather informed me of how the galena minerals we had begun to polish last week had accidentally been left polishing on the machine and had polished away into thin slivers of galena. Heather then presented newly polished galena molecules that practically shone like mirrors. We then headed off to the furnace room to remove the other two experiments that we had in the furnaces. After removing the capsules form the furnace, the sulfur was glowing its customary blood red color. We set the capsules down on a metal plate to cool before taking our experiments back to the lab. I tried to crack a capsule with the hammer, and though my initial attempt was under zealous my second was a little too enthusiastic as I sent glass all over the counter. Luckily the sphalerite and sulfur remained at the bottom of the capsule rather than flying across the lab. After cleaning up the glass I set to work trying to scrape off the sulfur. However, the sulfur was stuck firmly at the bottom of the capsule encasing the galena mineral. We left the capsule propped up in a beaker and full of ethanol to try and wear down the chunk of hardened sulfur. Due to my energetic hammer wielding, there wasn't much of a capsule left, and the sample was propped up in the smallest beaker I have ever seen.
 The tiny thumbnail sized beaker amused me to no end and held the galena capsule as I moved on to try my luck with the hammer on the second capsule. Luckily I had found the correct medium between not making a dent and shattering glass and was able to successfully gain access to the sample within without mishap. However, the sulfur had also formed a stubborn chunk within this capsule so we left it to soak in the ethanol. While the samples were soaking, we decided to clean off the polished galena minerals. They were attached by the crystal bond to the metal disk so we put the disk on a hot plate to melt the crystal bond. We then removed the galena minerals from the goo with tweezers and placed them in an acetone solution to remove the rest of the crystal bond. Heather than showed me the galena mineral under the microscope which after a couple minutes of careful angling so as not to catch the reflecting light of the microscope, we managed to get a great picture.
 After taking the picture, we scraped off a little more of the sulfur, but the minerals still remained trapped within. Daniele then had me seal the ends of a couple glass tubes so we would have some tubes ready to go for future capsules. Luckily I have gotten much better at sealing the tubes and Daniele gave me the seal of approval with every completed tube I showed her. We also put some sphalerite and recycled sulfur in a capsule to run another experiment at the higher 750 degree Celsius temperature. At this stage in our experiment, we are still collecting data on the diffusion of sulfur in the sphalerite and galena minerals. Next week we will continue working on capsules and maybe begin to analyze some data.
Daniele Heather and I spent most of today gathering the three different experiments we had running in the kiln last week. Daniele had already taken the sample we put in the kiln at 750 degrees Celsius so we headed off to the lab to extract our materials. To open the vacuum sealed tube, Daniele simply took a hammer and cracked one end of the tube open, leaving the sample at the other end of the tube easier to extract. We then began to scrape the sulfur from the sides of the capsule. After prying the sphalerite mineral from within the hardened sulfur, we placed it in acetone to try and get rid of some of the excess sulfur. We also squirted some ethanol into the capsule which helped remove the sulfur from the sides of the capsule, allowing us to recycle as much of the sulfur-34 as possible. After this, Heather informed me of how the galena minerals we had begun to polish last week had accidentally been left polishing on the machine and had polished away into thin slivers of galena. Heather then presented newly polished galena molecules that practically shone like mirrors. We then headed off to the furnace room to remove the other two experiments that we had in the furnaces. After removing the capsules form the furnace, the sulfur was glowing its customary blood red color. We set the capsules down on a metal plate to cool before taking our experiments back to the lab. I tried to crack a capsule with the hammer, and though my initial attempt was under zealous my second was a little too enthusiastic as I sent glass all over the counter. Luckily the sphalerite and sulfur remained at the bottom of the capsule rather than flying across the lab. After cleaning up the glass I set to work trying to scrape off the sulfur. However, the sulfur was stuck firmly at the bottom of the capsule encasing the galena mineral. We left the capsule propped up in a beaker and full of ethanol to try and wear down the chunk of hardened sulfur. Due to my energetic hammer wielding, there wasn't much of a capsule left, and the sample was propped up in the smallest beaker I have ever seen.


Friday, January 18, 2013
Galavanting with Galena
1/18/13
Today Heather, Daniele and I got quite a bit of work done. Right off the bat Daniele decided that we should try and diffuse the sulfur through a new mineral. Just like the sphalerite, we would use another sulfide called galena. We spent a couple minutes looking for a galena chunk with a smooth surface. This is because since we are measuring how far the sulfur diffuses through the mineral and the sulfur only diffuses a very short distance, it is important that the mineral has a level surface. That way the data of the diffusion across the face of the mineral is consistent. After picking out a prime candidate, I quickly filled the capsule with sulfur and then hooked it up to the vacuum before sealing it. Here is a picture of the crazy goggles I have to wear to protect my eyes while sealing a capsule:


 After the sandpaper, we placed the disk in a machine, that sanded the disk back and forth across a mixture of a powder and tap water. The powder contained a special substance that had a even smaller grain to continue to smooth out the surface of the galena on an even tinier scale. While the machine was working, we made another capsule, this time containing our usual sphalerite. We decided to run this sphalerite trial at 750 degrees Celsius to see what results we would get from experimenting with sulfur diffusion at a higher temperature. After finishing the capsule and putting it in the furnace, my time was up and I had to leave before we could get some computer work done. Daniele has promised to show me the programming set-up next week which hopefully will go well.
Today Heather, Daniele and I got quite a bit of work done. Right off the bat Daniele decided that we should try and diffuse the sulfur through a new mineral. Just like the sphalerite, we would use another sulfide called galena. We spent a couple minutes looking for a galena chunk with a smooth surface. This is because since we are measuring how far the sulfur diffuses through the mineral and the sulfur only diffuses a very short distance, it is important that the mineral has a level surface. That way the data of the diffusion across the face of the mineral is consistent. After picking out a prime candidate, I quickly filled the capsule with sulfur and then hooked it up to the vacuum before sealing it. Here is a picture of the crazy goggles I have to wear to protect my eyes while sealing a capsule:

Luckily there were no flaming incidents and I made the capsule easily. Here is the finished product where you can see the furnaces in the background:

We put the capsule in a furnace at 300 degrees Celsius and then headed back to the lab to work with the galena. Since galena does not have the same crystal formation as the sphalerite, the minerals do not naturally cleave to have very smooth faces. As a result, Daniele, Heather and I decided to polish some of the minerals in order to achieve the necessary smooth surface for sulfur diffusion. To do this, we took little circular disks of metal and placed crystal fragments with a very low heat tolerance on the disks. We then placed the disks on a hot plate and melted the fragments into a sticky goo. Picking galena pieces of approximately the same width, we pushed them into the goo. After the disk was taken off the hot plate and the goo allowed to cool, the galena chunks would be held in place for polishing. We polished the mineral basically using strips of sandpaper. We started off with a very rough sandpaper to try to generally start smoothing the bumps in the galena chunks. We then used a smooth sandpaper to begin to work out the scratches. The sandpaper is shown below and I am holding one of the metal disks with the galena chunks on it:

Thursday, January 17, 2013
Zany Zircons
1/11/13
Heather emailed me informing me that we will start meeting next week. Though I did not get to work with sulfur diffusion this week, Ms. Mroczka emailed me an article about zircons, the minerals Dr. Bruce Watson is working on. It turns out that zircons are the oldest rock discovered by scientists on Earth at an impressive 4.4 billion years old. The really interesting thing about zircons is how much they can tell us about the world 4.4 billion years ago. As rocks grow, they form bands, picking up surrounding minerals or any other substances in their path. Therefore, from the zircons, we can figure out what minerals were present on very very early Earth. From this information, Dr. Watson found that titanium had been present at this time and based on the quantity of titanium, Dr. Watson could estimate the temperature of Earth during the time the zircons formed. The important information that Dr. Watson derived from this information was that rock that crystallize at the temperatures he calculated need water. This means that according to Dr. Watson's zircons, water was present on Earth 4.4 billion years ago!
Dr. Watson has a few quotes in the article Ms. Mroczka emailed me, which can be found here: http://www.npr.org/blogs/krulwich/2013/01/10/169047159/the-oldest-rock-in-the-world-tells-us-a-story
Molten Mixtures
12/7/12-12/14/12
Though Heather was still in San Francisco, Daniele was at the lab and told me about the conference. She had presented to an overwhelming 20,000 scientists at the conference and luckily it had gone well. Daniele and I spent the day taking the capsule out of the furnace that we had put in last week and extracting the sphalerite and sulfur. When we took the capsule out of the furnace, the molten sulfur-sphalerite mixture was a glowing red. Daniele explained that the previously yellow chunk of sulfur turns red when it reaches molten temperatures. After the capsule had cooled, Daniele and I used a hammer to break the glass of the capsule. The popping sound we heard when we broke the glass confirmed that our vacuum within the capsule had remain intact. The sulfur and sphalerite had returned to their previous yellow color so I worked to recycle some of the sphalerite on the no longer molten mixture. I scraped the sphalerite from the sides of the capsule and put it in a container to use in our next trial of experiments.We removed the chunk of sulfer (which the sphalerite molecules had hopefully diffused through) which Daniele will take to Albany to analyze.
The next week Heather had returned from the conference. Heather decided that today would be a good day to find the hotspot of the furnace we had fixed two weeks previously. The hotspot is the area of the ceramic tube within the furnace that reaches the highest temperatures. All of the experiments should take place at the hotspot for consistency and so that the experiment receives the maximum temperature. The experiment is always lowered into the ceramic tube with a thermocouple to measure the temperature so to find the hotspot, we measured the temperature within the ceramic tube every 0.5 centimeters using the measurement markings on the thermocouple. Though it was time consuming to go centimeter by centimeter, waiting for the temperature to regulate at each new location, we finally found the area where the temperature peaked. Measuring the hotspot took up most of the time we met, but we had enough time for me to make a capsule on my own. Luckily, this time I did not send any flaming glass flying across the lab and successfully made my very own capsule assistance-free. We placed the capsule with the sulfur and sphalerite into the furnace at the newly-found hotspot and then headed into Daniele's office to look at some data. Daniele showed me graphs from her previous experiments with sulfur diffusion. Though the programming tools used to make the graphs showing the sulfur diffusion are still a little mystifying to me, Daniele said that second semester would focus more on organizing the data we have collected from our capsules. Hopefully practice will make perfect and I will be able to figure out the programming!
Monday, December 10, 2012
Fixing Furnaces
11/30/12
Heather was back this week and spent the day with Daniele and I. We hopped right to work as we headed to the room where they kept the furnaces in hopes of fixing a furnace that had been out of service for a few weeks now. The furnaces are humerously named after the three stooges (Moe, Larry, Shemp and Curly) along with the Marx brothers (Chico, Harpo, Groucho, Gummo and Zeppo). I was a little apprehensive, as fixing a machine that can easily heat up to 1100 degrees Celsius seemed to be a difficult task to say the least even though I did like their names. Daniele on the other hand seemed to think the furnace was anything but scary as she compared it to a high power toaster as we started to fix it. The furnace consists of a ceramic tube with a coil of wire wrapped around it. What often causes the furnaces to stop working is the coils of the wire will bend and touch each other, causing the furnace to short out since it produces heat using electrical energy. Insulation is then wrapped around the wire and tube and a thermocouple is tucked inside the insulation. The thermocouple gets hooked up to a monitor beneath the furnace and measures the temperature within the furnace. After sufficiently insulating the furnace and stuffing our contraption into its stand, it was ready to roll. We attached the wires to the electricity (double checking to make sure the furnace was switched off first) and the wires from the thermocouple to the monitor. The trick to matching up the wires is that the wire that hooks up with the red wire is magnetic. There is a little magnet next to the furnaces to ensure you are hooking up the right wires. We then turned on the furnace and to our delight it worked. Daniele had made a capsule while I was at Thanksgiving break and we put it in the furnace at a toasty 700 degrees.
With the furnace up and running, Daniele and Heather decided to show me how to make wires for a thermocouple. Daniele helped me cut two different types of wires to an appropriate length and then showed me how to cross the wires, forming a little "x" where the wires overlapped. A small machine would send a pulse of electricity through an electrode which would heat and seal the middle of the "x" where the two wires crossed one another together. Daniele easily lined up the minuscule center of the "x" on the tiny electrode and easily fused the two, then flipping it over to securely seal the other side. Then it was my turn. For some reason, my hand eye coordination was simply not on par and I could not line up the tiny "x" with the electrode to save my life. It got to the point where we had to stop and sand down the electrode because the build up from the wires was preventing the spark from even having a hope of fusing the two wires even if I could get my aim on target. After a few more tries, my persistence paid off and I successfully fused two sets of wires.
Daniele is going to a conference in San Francisco this week, but will be back in time for my internship next week even though Heather will still be gone. Hopefully we'll be able to take out our capsule and make a new one for another trial of our experiment.
Burning Blunders
11/17/12
Heather wasn't here today, so I spent the day with Daniele as we began our first experiment. Daniele had made a power point for me explaining our experiment which would be taking a closer look at the diffusion of different isotopes of sulfer through pyrite. Instead of pyrite, we are going to be using a mineral associated with pyrite called sphalerite. Since geological processes take so long, the movement of the molecules have to be measured on the molecular scale in nanometers. Daniele mentioned a machine at SUNY Albany that uses an ion beam that can make very specific measurements and give us results for our data. Daniele has used the machine several times and even suggested that we could take a trip down there one week to analyze our data.
After Daniele went over the power point with me, we went to the lab to make another capsule, this time containing the sulfer and sphalerite we would be using in our experiment. After I cut the silicon tube into an appropriate length, Daniele and I walked over to the furnaces to get one heated up to the appropriate temperature for our experiment. The furnaces reach the desired temperature by heating up and then shutting off, which causes them to often overshoot and then undershoot the temperature you want. This means it takes a while for them to settle on a temperature. Daniele and I set the furnace to a measly 700 degrees Celsius and then headed back to the lab to finish making the capsule. I sealed the end of the silicon tube like a pro and then placed the tube in a drying oven to remove some of the moisture from the tube. If there is moisture within the tube when you are sealing the other end, the heat from the flame combined with the evaporated liquid can cause an explosion, bursting the capsule and causing an overall unpleasant experience. After the tube dried out, I hooked it up to the vacuum. While we were waiting on the vacuum, Daniele and I walked back over to check on the furnace which was feeling rather fickle and refusing to settle on a temperature. We headed back to the lab to finish the capsule. I turned on the Bunsen burner and was feeling a little overconfident apparently because to my horror, as I tried to pull the end of the tube away to create a sealed vacuum, a discouraging pop echoed through out the lab as I compromised the vacuum. Not only did I pop the vacuum, but the capsule of hot molten glass sprung out of my tongs and went flying across the table. Luckily, I did not burn RPI to the ground and Daniele was more than forgiving. We agreed to finish the capsule next week when the furnace might be feeling more agreeable and my capsule abilities would hopefully improve
Sunday, November 11, 2012
Fun with Flames
11/9/12
Today was my first meeting with Heather and Daniele! After surviving my short journey through the RPI campus to the lab, I talked with Heather, Daniele, Veronica and Megan about my interests in Earth science. Heather showed me calcite, a crystal that makes up rocks such as limestone. Calcite has optical properties, so Heather wrote my name on a piece of paper. When Heather held up the calcite to the paper, it looked like my name had been written twice! After looking at the calcite, Daniele showed me how to make sealed tubes in which small reactions could take place for an experiment. First, we took hollow tubes of silicon glass. Other types of glass can be used, but according to Daniele, they get a little bubbly and harder to work with since they heat up more quickly than silicon. It took a few tries, but I was finally able to get the right ratio of oxygen and gas to get an extra hot blue flame from the Bunsen burner. To create my reaction chamber, first I had to seal one end of the hollow tube. I donned a pair of stylish clunky glasses to protect my eyes from the flame and slowly rotated the tube around the flame until the glass from the edges eventually came together to form a dome. Then, I attached the other end of the tube to a machine that would make the inside of the tube a vacuum, because if this was to be used in an experiment, we wouldn't want our reactants interacting with the air within the tube. After waiting for the machine to create the right conditions in the tube, I turned on the Bunsen burner and after a few more tries, got that blue flame of success. I then held the middle of the tube up to the flame while the top of the tube was still attached to the machine, thereby preserving the vacuum. As the tube heated up, I slowly pulled it downward until I pulled the melty glass away from the top of the tube. My work was done and I had to run back to school in order to make it to the open house on time. Daniele and Heather were nice enough to offer to let me keep my tube (much to the delight of my English class which I lectured later on the steps to creating such a tube) as a testament to my hour of determined work. Even though I had a shorter session, I still had a lot of fun (how could I not playing with fire?) and can't wait for my next meeting on Friday.
Today was my first meeting with Heather and Daniele! After surviving my short journey through the RPI campus to the lab, I talked with Heather, Daniele, Veronica and Megan about my interests in Earth science. Heather showed me calcite, a crystal that makes up rocks such as limestone. Calcite has optical properties, so Heather wrote my name on a piece of paper. When Heather held up the calcite to the paper, it looked like my name had been written twice! After looking at the calcite, Daniele showed me how to make sealed tubes in which small reactions could take place for an experiment. First, we took hollow tubes of silicon glass. Other types of glass can be used, but according to Daniele, they get a little bubbly and harder to work with since they heat up more quickly than silicon. It took a few tries, but I was finally able to get the right ratio of oxygen and gas to get an extra hot blue flame from the Bunsen burner. To create my reaction chamber, first I had to seal one end of the hollow tube. I donned a pair of stylish clunky glasses to protect my eyes from the flame and slowly rotated the tube around the flame until the glass from the edges eventually came together to form a dome. Then, I attached the other end of the tube to a machine that would make the inside of the tube a vacuum, because if this was to be used in an experiment, we wouldn't want our reactants interacting with the air within the tube. After waiting for the machine to create the right conditions in the tube, I turned on the Bunsen burner and after a few more tries, got that blue flame of success. I then held the middle of the tube up to the flame while the top of the tube was still attached to the machine, thereby preserving the vacuum. As the tube heated up, I slowly pulled it downward until I pulled the melty glass away from the top of the tube. My work was done and I had to run back to school in order to make it to the open house on time. Daniele and Heather were nice enough to offer to let me keep my tube (much to the delight of my English class which I lectured later on the steps to creating such a tube) as a testament to my hour of determined work. Even though I had a shorter session, I still had a lot of fun (how could I not playing with fire?) and can't wait for my next meeting on Friday.
Tuesday, October 30, 2012
Early Encounters
11/22/12
Today, Mr. Evans picked Sherry and I up from Emma and took us to RPI to meet our mentors for the first time. Once we finally made it passed the roadwork, we were at RPI in no time and ready to meet the team. Dr. Watson is the head scientist we will be working under in collaboration with the rest of his team, consisting of Heather (a research scientist), a research professor and two undergraduate students. After quick introductions, Dr. Watson proceeded to show us around the lab where the research team had access to a myriad of "cool" science tools. Since the research team deals with different fields of Earth science, Sherry and I oohed and ahhed at machines that put tremendous amounts of pressure on substances and cookers that could heat substances more than hot enough to roast you alive. These machines strive to simulate conditions within the Earth's crust and as Heather explained: there is more known about materials found on different planets than the substances beneath the Earth's crust. Sherry and I also bore witness to an extra fancy microscope that would send out a beam of electrons on a substance. This microscope could then both create a picture of the substance and even identify atoms that made up that substance. The microscope was very accurate and could identify even a substance that was only one part of five million. We were impressed to say the least.
Hopefully I will be able to start my internship next week and get to try some of these machines out for my own!
Subscribe to:
Comments (Atom)